How to Install MySQL on Raspberry Pi 3B with phpMyAdmin
Python can be used in database application. one of the most popular database is MySQL. MySQL is a freely available open source Relational Database Management System (RDBMS) that uses Structured Query Language (SQL). SQL is the most popular language for adding, accessing and managing content in a database.
This article provide installation steps of MySQL on raspberrypi 3B with phpMyAdmin.
Open Linux Terminal:
$ sudo apt-get update
$ sudo apt-get upgrade
$ sudo apt-get intall -t stretch apache2
$ sudo apt-get install -t stretch php7.0
$ sudo apt-get install -t stretch php7.0 -mysql
$ sudo nano /var/www/html/info.php
Type below line in open info.php file
<?php
phpinfo();
?>
After adding above line save and exist from this file.
Now ,open the any internet browser and type your Raspberry Pi IP address in search bar.
my Raspberry pi ip address is 192.168.108 .
192.168.108
192.168.108/info.php
info.php page will open. now, reboot the Raspberry Pi.after rebooting Pi follow the bellow command in terminal.
$ sudo apt-get install -t stretch mysql-server
$sudo apt-get install -t stretch mysql-client
Again reboot the raspberry pi after installation of mysql server and mysql client.
next step is to install phpmy admin with some package configuration.
$ sudo apt-get install phpmyadmin
one message box will open with two option. select Apache2. press the ok button. set password and configure password again then give ok.

$ sudo apt-get install mysql-server
$ sudo apt-get mysql_secure_installtion
$ sudo mysql -u root -q
$ sudo apt-get install python install python-mysqldb
$ sudo mysql -u root -p
this commands will connect mysql with phpmyadmin. now open apache2.conf fig file and type bellow line in the end of file, save it and exit from file.
$sudo nano /etc/apache2/apache2.conf
include /etc/phpmyadmin/apache.conf
now, starts the apache2 service.
$ sudo /etc/init.d/apache2 restart
Set all the privileges for the user "root"
$ sudo su
# mysql -u root -p
MariaDB[(none)]>GRANT ALL PRIVILEGESon*.*to'root'@localhost'IDENTFIED BY 'test';
MariaDB[(none)]>FLUSH PRIVILEGES;
MariaDB[(none)]>\q
#service mysql stop
#service mysql start
go through web browser and run the phpmyadmin
192.168.1.104/phpmyadmin/index.php
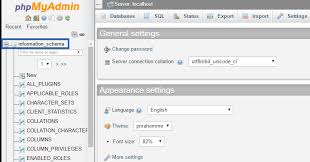
Select local host.Enter the i.d and password. Mysql will start with php myadmin.

Php myadmin webpage willlook like this with mysql.


Thank You
ReplyDelete